Saturday, January 1, 2011


I’ve opened a new Etsy shop “The Happy Lunchbox” with my little works of happy art! I put one of these notes in my daughter’s lunchbox each day and she loves getting them.


Posted in :
school parties
Thursday, December 16, 2010
The party favor sacks for my daughter’s Kindergarten class were fun to put together. Here’s a pic of the loot:

Each favor sack included an activity book, pencil, eraser, hot chocolate, Hershey’s kisses, candy canes, coupons for free food and bowling at local establishments, reindeer food (see previous post) and gingerbread s'mores makings.
Gingerbread s’mores makings = ginger snap cookies, chocolate and marshmallows plus instructions in a gingerbread baggie…


Since it was a gingerbread themed party, I went with brown paper sacks as the gift sacks and used my Cricut to create names and pictures on the front…

Cute, but I thought they needed something more. So after grabbing a few supplies…


the finished project looked like this:


Each child was given a Santa hat (from Dollar Tree) that came with the words “Jingle All the Way” stitched on it, so I attached three jingle bells on each hat. The kids got to decorate gingerbread cookies and play Bingo. Just look at the munchkins having fun…


Merry Christmas!
Posted in :
Christmas,
school parties
Tuesday, December 14, 2010
One of the party favors I made for my daughter’s class party is “Reindeer Food”. There are other examples floating around on the internet, and here is my version…

Closeup:

I used small craft bags, scrapbook paper with the printed verse, and snowflake brads.
Each bag contains 2 tablespoons of oatmeal and a few shakes of colored sugar (red and green).
The verse reads:
Sprinkle on the lawn at night,
The moon will make it sparkle bright.
As Santa’s reindeer fly and roam,
This will help them find your home.
Sprinkle on the lawn at night,
The moon will make it sparkle bright.
As Santa’s reindeer fly and roam,
This will help them find your home.
Great inexpensive party favor!
Posted in :
Christmas,
school parties
Thursday, December 9, 2010
This week, I finished up two different clipboards I’ll be giving as a gift to a kindergarten teacher,
This one features a print of my original artwork. The black and white polka dots is some leftover wrapping paper.

Here’s a closeup:

The next one is an alphabet featuring Nick Jr. characters. Each character’s name starts with the corresponding letter (except Q and X). The teacher will appreciate this clipboard functionality, and I know the students will appreciate the artwork!

Another closeup…

Merry Christmas!
Posted in :
Christmas,
teacher gifts
Wednesday, December 1, 2010
One day last year, I was shopping and came across this sign at Goodwill.

It wasn’t long before I decided to paint some fun Christmas gingerbreads on it…

A few closeups…


Lots of color on a classic black background. The board is about 14 x 18 so it’s a great size to make a statement on the wall! Distressed and festive, too!
Linking this up to The CSI's Painted Holiday Challenge party. Go check it out!
Thanks for looking!
Monday, November 22, 2010

I made a handful of these faux gingerbread cookies for swap. They’re a snap to create, and today’s tutorial shows you how I made ‘em…
First, I bought a roll of cork (the non-adhesive kind) at Hobby Lobby. I used a cookie cutter to trace the outline of the cookie and then I cut it out.

Next, I used a combination of brown Folk Art paints (I used Real Brown and Teddy Bear Brown) to paint the cork on both sides. Dipping the brush in both shades of brown before brushing onto the ornament gives it a more natural, shaded look. A solid brown color would work just as well.

I used some white dimensional paint (Americana Writer) for the icing. I did this freehand, but you could mark with chalk or a pencil first.

A fresh “baked” batch…

Finally I used a regular hole punch to punch a hole at the top of each ornament, then strung them with pink and white polka dot ribbon.

How cute would these look in a treat bag and given as a hostess or teacher gift? An easy craft the kids can help with, too. Enjoy!
Tuesday, November 2, 2010
This week I tried my hand at making a gingerbread themed tassel ornament. Here’s how I made mine…
First, I went to Hobby Lobby and bought a wooden candlestick holder and a wooden ball (with flat bottom) and painted them brown (Folk Art Teddy Bear Brown and shading with Folk Art Real Brown).

I also purchased some eyelet screws from Hobby Lobby and put one in the center at the top of the ball. To get the hole started, I hammered a small nail first, then it was easy to screw in the eyelet.

Time to get out your glue gun! I used about 6-7 different ribbons and a couple of fringe pieces in varying widths and patterns and started gluing. I started at the bottom and glued a few strips of wide striped rick rack. (Note, the bottom of the tassel is actually the top of the candlestick holder. I hot glued the pieces around the rim of the holder.)


Below you can see how I glued these first strips into the candle holder area…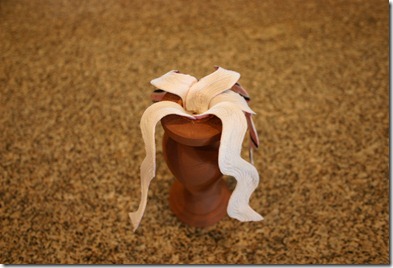

Next, I glued ribbon into loops around the base of the tassel.

Keep going with different ribbon as you create new layers up the tassel, being careful not to cover up previous layers. I like the loops because it created a lot of volume. Be sure your strips are long enough to loop and still hang where you want them to before you start gluing.
Creating more layers using fringe and ribbon…


Below is where I’d do things different next time. When I got to the top, I did a row of dangling white rick rack before the last layer of brown gingham. If I make another tassel, I’d do all ribbon loops and/ or add another layer of fringe just for the fullness.

I painted a gingerbread face on the ball using white Folk Art dimensional paint, and while that was drying…

… I glued a braided fringe around the top edge of the tassel, covering all the end pieces of the ribbons and excess glue. Then I hot glued the “head” to the tassel and tied a bow in the eyelet on top! (There’s still room in the eyelet for an ornament hook for hanging.)

Below are a couple of photos of the final tassel.


One trick I tried was singeing any raw edge of fringe or rick rack to keep it from fraying. (This wasn’t necessary on the layers with loops, because both raw edges are out of sight.) When you hold the rick rack close enough to the flame, you can actually see it retract some and then when you’re done, you can feel a difference in the edge. It “seals” the edge with a very slight texture and keeps the edge from fraying. Nice trick. Just don’t get too close to the flame. If you actually singe or burn white rick rack it turns black, so be careful. I’m just sayin’.

Hope this tutorial was helpful! I will say it was fairly easy to do, just took a little time since I hadn’t made one before and there are a few supplies involved. The hardest part for me was picking out the ribbon! So many great choices and themes, but I opted for pink and brown…
Let me know if you make one, too! I’d love to see it. Thanks for visiting.
Subscribe to:
Posts (Atom)


