Saturday, May 7, 2011

I found some fabulous straw chargers/placemats at an estate sale today and snatched them up quick.  They had that “Ballard” look I was after, and I knew just exactly what I was going to paint on them when I got them home…
BEFORE
Placemats - Before
AFTER
Placemats - After

IMG_4100

IMG_4101
Don’t ya just love ‘em?
Thanks for visiting!

Linking to:

Monday, May 2, 2011

I’m considering a change for my daughters’ shared bathroom, which is currently a pink and green ladybug themed room. But I’ve grown tired of this look, so I am considering a makeover. The girls are going to be 5 & 7 this year, and I plan on keeping the new look for at least 3 years.
I’m thisclose to taking the plunge and painting horizontal stripes on the walls.  I still want a room that’s bright and cheery, just less juvenile.
Here are three different mood boards I’ve created for the room.
Option #1: The Yellow, Black and White Room (with yellow and white striped walls)
girls bath1

Option #2:  The Green, Blue and Gray Room (with gray and white stripes on the wall using leftover gray paint from this room)
 
girls bath2

Option #3: The Pink, Black and White Room (with pink and white striped walls)
girls bath3
What’s your favorite? What other elements would you incorporate?
Thanks for visiting!
Posted in :

Monday, April 25, 2011

When we decided to paint the bathroom … we wanted a relaxing blue/green/gray color.   After pondering many gorgeous colors for days…

before2 - Copy


…we settled on Martha Stewart’s Forest Lichen.  (Note: We did this project back when Martha was selling at Lowe’s.  Now she’s at Home Depot and the color names have changed.  If you’re interested in the formula, just let me know.)
Image (24)

In some light, the color reads blue and in others it reads green.  It is exactly what we were looking for.

Here’s some before and after photos:
beforeafter1 

**********************

beforeafter2
 
***************************

beforeafter3 

********************

beforeafter4

**************************

beforeafter5

**********************************

beforeafter6 

**************************
 
beforeafter7

Blue is not an easy color to pick.  But, overall we’re pleased with the result. 
Next project for this room: framing the boring builder’s mirrors, some cabinet hardware, and a new window treatment for the large window over the tub.  The window scarf doesn’t do a thing for afternoon sun.  Suggestions welcome.

Hope you enjoyed the before & after!


Linking to:
Under The Table and Dreaming
Just A Girl 
Beneath My Heart
Thrifty Decor Chick 
Posted in :

Friday, April 15, 2011

Today I’m sharing a fun and quick project for Spring.  I started with an unfinished piece of wood, gave it a quick basecoat using white paint, and then grabbed my robin’s egg blue paint.
IMG_3506
I used my Cricut to make a stencil with the words, then brushed on the paint, highlighting with white.
peter2 
Thanks for visiting!

I'm sharing this with:
Posted in : ,

Tuesday, April 12, 2011

Here’s a simple idea for snack time: 
IMG_3301

Take a cone-shaped clear cello treat bag (Hobby Lobby, 25/1.99) and fill it with a kid friendly, orange finger food (CheezeIts, Cheetos, Goldfish, etc.
IMG_3299

Then tie it up with some green “leaves” (ribbon, yard, pipe cleaners, etc.).
IMG_3300

Now you’ve got my kind of vegetable! Great for kids snacks and parties.

Linking to:

Posted in : ,

Tuesday, April 5, 2011

You’ve probably seen these great Easter eggs in the Pottery Barn catalog already:

PB Eggs

Source: Pottery Barn

Here’s my version, and today I’ll show you how I did it:
IMG_3267

I started with these eggs and moss from Hobby Lobby.
I already had the glass jar.
IMG_3090

I used a one inch stencil to dry brush the letters onto the eggs.IMG_3264
(Side note … I found this wooden game board at Goodwill many months ago and bought it for $1.  Works great for when I’m painting round objects like eggs and Christmas ornaments. )

Next, I glazed the eggs using Ralph Lauren’s Smoke glaze. Glaze one side at a time by applying with a sponge brush and wiping off with a paper towel.
IMG_3260

It’s subtle, but you can see how the glaze is softening up the bright white eggs. Here’s one half done so you can see the difference:

IMG_3262

I chose random letters and numbers…
IMG_3266

IMG_3267

I placed the eggs and moss in the glass jar turning the eggs so they faced out:
IMG_3268

A fun addition to my Easter decor…
IMG_3269
IMG_3270
IMG_3280
IMG_3284
IMG_3285

Theirs:
PB Eggs

Mine:
IMG_3266

Thanks for visiting!

Linking to

Friday, April 1, 2011

Here’s a picture of the dresser I’m talking about today:
IMG_2803

I tell you right up front I don’t have a picture of the dresser in its before state.  But I will tell you it matches this nightstand (they are part of the same set, though used it different rooms in our house).
So….consider this the BEFORE:
nightstand
The black lines are deep grooves in the wood which have been painted. 

When I decided to move the dresser into my youngest daughter’s room, it required a makeover so it would match the room.  I had found some gorgeous green textured fabric that I wanted to incorporate in her room somehow, and with a dresser makeover looming, an idea was born.


AFTER:
IMG_2803
I decided to pad and cover the drawer fronts for something different. These drawers worked well for this type of project, because they had enough of a lip on the edges for me to add batting and then wrap fabric around them.
First, I cut a piece of batting the same size as the drawer front. 

Next, I cut a piece of the fabric about 1.25 inches larger than the height and width of the  drawer front. 

Finally, I wrapped the fabric around the edges and used a staple gun to attached to the drawer fronts:

IMG_2805
I attempted to fold the corner fabric with a miter fold.
IMG_2806
IMG_2807
The drawer pulls are a nonstandard size, and rather than replacing them, I opted for a more colorful solution of covering them with fabric.
For the fabric on the drawer pulls, I measured the width of the pull (about 5.5 inches) and then doubled that. This would give me 11 inches of fabric so I could have a scrunchy look to the pull. I folded the fabric in half lengthwise and then sewed the edges together, leaving the ends open.  I slipped the fabric onto the existing pulls, then just replaced the hardware.

IMG_2804
AFTER:
IMG_2799
IMG_2802
IMG_2803
This room started as a nursery, but as it grows with my daughter my inspiration for decorating is this room:
pink walls with blue and green room  

(source: Pottery Barn Teen, retired bedding)

I like how the walls are pink, but everything in the  room is green or blue.   So far, I’ve got the pink walls, the PB drapes, a green dresser, and a blue & white polka dot quilt on the bed. Not a big start, but a start none the less!
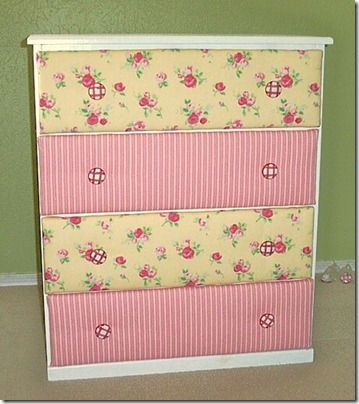
By the way, the dresser drawer project worked so well, I recreated a second one (garage sale, $10) for my other daughters room:dresser

Happy Furniture!

Linking to:
Powered by Blogger.